Showing posts with label Crafts. Show all posts

Thursday, September 23, 2010

DIY - Small wooden signs

Recently at the Plymouth Blueberry Festival, I found so many neat craft ideas. I really like small wooden signs with cute words or phrases. Because they are small pieces of wood with some paint on them, it seemed a little silly to pay $3-$7+ for them when I could make them myself for a fraction of the cost!
I found this piece of wood at Lowes for $1.80. It was 1" by 2" & 6' long.

After you have your wood and your hand saw, decide how long of a piece you will need for your word or phrase. To do this, it is best to print off similar sized words or phrases onto plain computer paper and use that to determine the length of wood you will need.  I used pieces that were 3.5-5 inches.


It doesn't matter if your cut is perfect. I had to cut slowly and only in one direction to keep it from splintering a lot on the ends.


Next, take a piece of fine sand paper and sand the small piece of wood, wiping the dust off with a slightly  damp microfiber cloth. Now you are ready to paint it.

I found my paints at Jo-Ann Fabrics for about .89 cents each. Any brand of craft paint (or even spray paint or a quart of paint) will work. Priming is optional, but probably not necessary. I did not prime my pieces before painting them. 

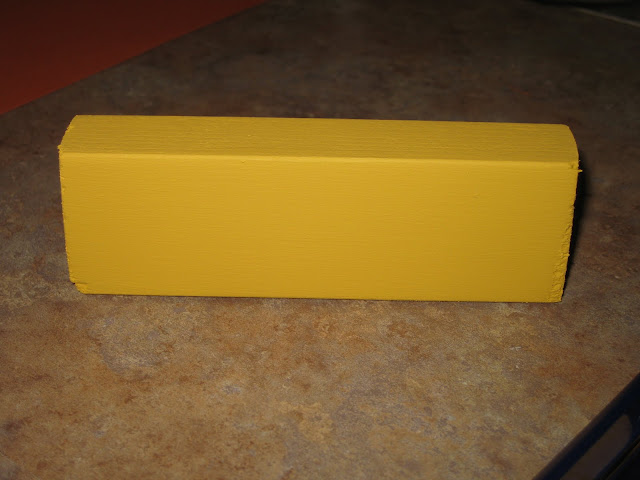
Next, paint your wooden blocks. I gave my blocks two to three coats. Use more or less as needed. I used small foam brushes and they worked very well for me.


I chose to use computer font on my blocks because I do not have a steady hand for painting tiny words. I found that I had a few pieces of color coordinating scrapbook card stock that would coordinate with the colors of paint I was using. I used a printer to print the word onto the card stock and cut it to fit the front of my blocks.


Using Mod Podge, cover the "front" of your block with a thin layer.
U

Carefully place the card stock on the front of your block, using the Mod Podge as glue.


Use a card to smooth the piece of card stock onto the wooden block.


Then paint Mod Podge over the front of the block. If you are using paper with computer ink on it, be careful to only brush over the ink a few times for your first coat of Mod Podge or the ink may smear. After your first coat is dry, the Mod Podge will project that from happening as you do additional coats on the front and all over the block. Painting and Mod Podging are the lengthiest part of this craft, so make sure you find something fun to do while they dry. I did 2-4 coats of Mod Podge. I used Matte finish Mod Podge but Satin or Gloss would work just as well.


I made a total of three Autumn word signs:
"Pumpkins - 5 Cents"

"Autumn Blessings"
And "Harvest Moon".

Time to have fun playing around with various tablescapes! :)

Total Project Cost:
Wood: $1.80
Paint: $2.70
Card Stock: $.60
= $5.10 for three signs.
Plus, I have another 5 feet of wood to make more!

 This is just me.... enjoying the simple things!

Thursday, September 9, 2010

Sweet curtains

Welcome to our back door. Nevermind the fact that it is an old door, and it seems to be hanging a little crooked. Nevermind the crooked hanging curtain (at least I can say that I didn't hang it so it isn't my fault that it is crooked). It is our backdoor and I invite you to take a peek at the transformation that it experienced today.


Our doors have these large window panels. They're an odd size. You cannot buy curtains this size. I tried. They don't sell them in our little town. So I had to solve this problem myself. The old curtain was dirty. It blended in. It didn't pop. And, really, it was just too bland.


Clearly, a sweet lavender gingham would much better suite my backdoor. So much more welcoming. So much happier. The color went quite well with the kitchen. It would add just the perfect touch. 


I spent the majority of the day cutting, pinning, and ironing. The dishes? They're still in the sink. The letters that need mailed? Forgotten. The other plans that I had for today? Ignored. Cutting, pinning, and ironing seriously takes a lot of time. (especially when you are inventing the pattern as you go...)


The end result? Perfect. Exactly like I had envisioned. The color popped. The gingham made it warm and welcoming. The little ruffles at the top made me smile.  : )


The fact that they are two panels allows me to open them and let natural light in which was so important to me. Then, at night, I can close them so that the neighbors won't see me scurrying to the fridge in my pajamas to get a glass of water. : )

Borrowing my mother's sewing machine has been inspiring me so much to get some projects done around the house. Sometimes, that means other household things get put on the back burner... but sometimes, that is just the way it has to be. The dishes will wait. Letters that need mailed don't complain much. And I've still got a bit of my afternoon left... The weather is beautiful and I think that means I should walk to the post office and soak in the taste of fall that is in the air!

Tuesday, September 7, 2010

Sewing Success - Rice Heating Bag

Today, I was nearly whipped by my great grandmother's sewing machine.
I'm borrowing it from my mom. Super exciting because I've had several sewing projects waiting in the wings for weeks now. My first project had to be simple as I was reminding myself how to work the sewing machine. Since my parents were here this past weekend, my mom was able to set up the thread for me and remind me how to use her vintage Singer. But of course, it didn't end up quite that easy...

I began with these fabrics...the yellow gingham for the actual pouch and the dark teal fabric for a slip cover. (yes. I do realize that these two fabrics do not match. At all. But they didn't have to. Just wait and see.)
My sewing trouble began when I used a small scrap of fabric to test the stitches. 
See that big knot of lavender thread? That's what happened.
I don't know how. But it did.
Of course, this led to the bobbin needing to be re-threaded and pulled up by the needle. Simple enough, right? Unfortunately not. 
I spent over an hour trying to figure out how to make the needle pick up the bobbin thread and pull it up. I read online manuals. I watched videos on youtube. I was convinced that it was impossible. Until I finally tried turning the manual stitch knob the opposite way from which I had been turning it. And voila! It worked.


I finally got this little pouch sewn and filled with rice. I should have taken a picture of the rice that spilled all over the counter. But my camera battery died mid-project. It was exciting though. I do not have a funnel. So I used a newspaper rolled into a cone. It worked. Except for the rice spill. I'll be investing in a funnel in the future! : )

I decided to make a slipcover for my heating bag instead of just using two layers of fabric after reading the benefits of being able to wash the slipcover. I researched how to make a slipcover for a pillow and followed the same guidelines. Did I mention that it was incredible easy?! Make seams on each end that will be your flaps where you insert the heating bag. Then, fold it inside out, making sure your bag will fit inside. And sew the ends.


The two flaps overlap to form the back of the slipcover where you will insert the heating bag.

All I had to do was turn the slipcover right-side out....


And insert the rice heating bag.

The pouch was then complete and ready to be tried out!

Heat for 30-60 seconds. Remove carefully and shake a bit to distribute the heat.


I have an electric heating pad. But I like the Rice heating bag for several reasons. Not only will it easily conform to a muscle ache, whether its an ankle, back, or tummy... I could also put it at the end of the bed to keep my tootsies warm this winter as I am falling asleep! I think it'll be well worth it!
In the end, the project was quite simple, minus the long delay at the beginning! How rewarding to finally get the first of several sewing projects complete!!!